
[Web dev for beginners] Installing npm packages and bundling
This blog post is part of the series “Web development for beginners” – which teaches people who have never programmed how to create web apps with JavaScript.
To download the projects, go to the GitHub repository learning-web-dev-code and follow the instructions there.
I’m interested in feedback! If there is something you don’t understand, please write a comment at the end of this page.
In this chapter we develop a small web app in the same way that large professional web apps are developed:
- We use libraries that we install via npm.
- We write tests for some of the functionality.
- We combine all JavaScript code into a single file before we serve the web app. That is called bundling. (Why we do that it explained later.)
File system structure of a project that uses npm packages
Creating web apps that use npm packages is more complicated. Let’s explore the file system structure of the upcoming project word-guessing-game/.
In this section, we take a look at the files that exist at the top level of the project:
package.json
node_modules/
build/
html/
js/
Managing npm packages:
package.jsoncontains information about the project such as the npm packages it uses. These packages are called the dependencies ofword-guessing-game.node_modules/contains the dependencies we have installed. Before we install anything, it is empty or missing.
Output:
build/contains the final web app that is complete and ready to be served.
Input:
html/contains HTML files that are copied tobuild/.js/contains JavaScript files that, along with npm library code that we use, is bundled into the single filebuild/bundle.js.
The project word-guessing-game is itself an npm package: Roughly, any directory with a package.json file is an npm package. It benefits from the ability of a package to install other packages inside itself and use them.
Downside: We need a build step
One downside of the new development approach is that there are now two versions of our web app:
- Development version: The JavaScript code is contained in many files.
- Deployed version (that we can serve): The JavaScript code is contained in a single file.
To get from development version to deployed version, we need to build the app. This extra step is less convenient that what we did previously: The files we wrote could also immediately be served.
What is bundling?
If an app uses libraries installed via npm then the total of its code consists of:
- The app’s own JavaScript files.
- The JavaScript files stored in npm packages.
Bundling means creating a single file that contains all of that JavaScript code. An app that bundles is called a bundler.
Why is that useful? There are two main benefits:
- Loading a single large file is usually faster than loading many smaller files.
- The bundle only contains the code that is actually used. Most apps have a single main module where execution starts. A bundler analyzes that module and includes its imported code, the code imported by that code, etc. That is especially useful for npm libraries because we rarely need all of the functionality they provide.
There is one additional minor benefit. In our code, we import a function randomInt() from the npm package es-toolkit (documentation). That looks like this:
import { randomInt } from 'es-toolkit';
Without extra configuration, that syntax doesn’t work in browsers. By including the npm code in the bundle, the bundler takes care of that for us.
Installing the npm packages
Initially, there is no directory node_modules/ (or it is empty). Therefore, we need to install the npm packages (as listed in package.json) before we can build and run the web app:
cd word-guessing-game/
npm install
package.json
This is what package.json looks like (the contents of "scripts", "dependencies" and "devDependencies" are shown later):
{
  "type": "module",
  "scripts": {
    // ...
  },
  "dependencies": {
    // ...
  },
  "devDependencies": {
    // ...
  }
}
package.json contains a JSON object with the following properties:
"type"tells Node.js that a file whose filename extension is.jsis a JavaScript module."scripts"defines shell commands that we can use during development. We’ll learn how to invoke those shell commands soon. They are called package scripts."dependencies"lists npm packages that we need at runtime (while the app runs). Therefore, those packages are usually libraries."devDependencies"lists npm packages that we only need during development. Therefore, those packages are usually development tools (shell commands that help us with development).
Normal dependencies (runtime dependencies)
Property "dependencies" lists the library packages used by our app:
"dependencies": {
  "es-toolkit": "^1.39.10"
},
npm install downloads the dependencies into node_modules, after which we can import from them like this:
import { randomInt } from 'es-toolkit';
The name after from is the name of the npm package.
Development dependencies
Property "devDependencies" lists the npm packages with shell commands that we use in package scripts (shown later):
"devDependencies": {
  "copyfiles": "^2.4.1",
  "esbuild": "^0.25.9",
  "live-server": "^1.2.2",
  "shx": "^0.4.0",
  "simple-file-watch": "^3.0.0"
}
- Build tools:
esbuildis a popular bundling tool.simple-file-watchwatches directories and/or files and runs a shell command every time anything changes.live-serveris a web server with live reloading. It reloads a web page in the browser whenever the underlying file changes.
- Cross-platform shell commands:
copyfilescopies directories of filesshximplements Unix shell commands such asrmin JavaScript.
We’ll see how exactly the build tools fit together when we take a look at the package scripts. The cross-platform shell commands are needed by those scripts because we want them to work on both Windows and Unixes (macOS, Linux).
Ways of using npm install
These are three common ways of using npm install:
npm installinstalls all packages listed as dependencies.npm install some-packageinstallssome-packageand adds it to"dependencies".npm install --save-dev some-packageinstallssome-packageand adds it to"devDependencies".
You can also use #2 and manually move the entry from "dependencies" to "devDependencies".
"scripts": package scripts
These are the most important package scripts:
"scripts": {
  // ...
  "build": "...",
  "watch": "...",
  "start": "...",
  "test": "..."
},
In a shell, we can run (e.g.) the "build" script via:
npm run build
For two scripts, there are additional, shorter commands:
start:npm starttest:npm testornpm t
The big picture
The actual shell commands behind the scripts are a bit complicated. You don’t have to understand every detail – as long as you keep the following basics in mind:
buildis used to generate the complete web app inside the directorybuild/.watchwatches the directorieshtml/andjs/and re-builds the app whenever a file changes. That is useful during development because we don’t have to constantly manually run thebuildscript.startruns a web server that serves what’s inside thebuild/directory. That web server automatically reloads a web page in the browser whenever the served file changes.testruns the tests injs/.
During development, watch and start run at the same time (usually in separate terminals) and the following steps happen repeatedly:
- We save an HTML or JavaScript file.
- That is observed by
watchwhich invokesbuild. buildwrites a new version of the app tobuild/.- That is observed by
startwhich reloads the app’s web page in the browser.
In other words: Every time we make a change, we automatically see the results in the web browser.
Trying out the package scripts
- Open two terminal windows:
- Window 1:
npm run watch - Window 2:
npm run
- Window 1:
- Open the web app in a web browser.
Now make changes to the files:
- Change
word-guessing-game/html/index.html– e.g.<title>. - Change
word-guessing-game/js/main.js– e.g. add a character such as|at the end of the following template literal:`<button class="letter" disabled>${letter}</button> `
Whenever you save a file, you should automatically see change in the web browser.
The shell commands
Let’s take a look at the scripts we are using in this project.
-
"build:clean": "shx rm -rf \"./build/*\""This script removes all files inside the
build/directory. Thanks to packageshxwe can use the Unix commandrmon all platforms. If we mention a double quote inside a string literal with double quotes, we have to escape it by putting a backslash in front of it. Therefore, the actual shell command is:shx rm -rf "./build/*" -
"build:js": "esbuild --bundle --format=esm js/main.js --outfile=build/bundle.js"This script uses
esbuildto create the bundlebuild/bundle.js. It does so by collecting all code used (directly and indirectly) byjs/main.js. -
"build:html": "copyfiles --up 1 \"./html/**/*.{html,css,svg,jpg,png}\" ./build"This script copies the files in
html/tobuild/. It only copies HTML files, CSS files and images. -
"build": "npm run build:clean && npm run build:js && npm run build:html"Building means: first clear out
build/, then createbuild/bundle.js, then copy all HTML files tobuild/. -
"watch": "..."This is the shell command:
simple-file-watch --run-on-startup --recursive --path="html" --path="js" --command="npm run build"simple-file-watchwatches all files (due to--recursive) inside the directorieshtml/andjs/. Every time one of those files changes, it invokesnpm run build. Option--run-on-startupmeans thatsimple-file-watchadditionally runs the--commandonce, immediately after we invoke it (before watching for file changes). -
"start": "live-server build --wait=1000"The web server
live-serverserves directorybuild/. If any of the served files change, the corresponding web pages are automatically reloaded in web browsers. We specified a delay of 1000 milliseconds after the detection of a change in order to give thebuildscript enough time to write all of its files.
If you want to find out more about an npm package, you can look it up on www.npmjs.com.
We use double quotes for quoting and && for running shell commands in sequence because that works in most shells (more information).
Module specifiers
A module specifier is the text in quotes after from in an import statement – e.g. 'node:fs' in the following code:
import * as fs from 'node:fs';
There are three kinds of module specifiers:
-
Relative specifiers are relative URLs (starting with
'/','./'or'../') – for example:'./sibling-module.js' '../module-in-parent-dir.mjs' '../../dir/other-module.js'They refer to modules in the current code base.
-
Bare specifiers are paths (without protocol and domain) that start with neither slashes nor dots. They begin with the names of packages. Those names can optionally be followed by subpaths:
'some-package'
'some-package/sync'
'some-package/util/files/path-tools.js'
Bare specifiers refer to modules installed in
node_modules/. -
Absolute specifiers are full URLs – for example:
'https://esm.sh/es-toolkit@%5E1'
'file:///opt/nodejs/config.mjs'
Absolute specifiers are mostly used to access modules that are directly hosted on the web. There are sites that serve all npm packages via URLs. The
esm.shURL above is an example: It makes the npm packagees-toolkitavailable to us – without us having to install that package locally. Such sites are called CDNs (Content Delivery Networks). This is a list of a few CDNs:Using CDNs is convenient because we don’t have to install anything via npm. But they also introduce an additional point of failure. Therefore, they are fine for quick experiments but I would not use them for actual projects.
Node.js uses specifiers such as 'node:fs' for its built-in modules. These can be viewed as bare specifiers with a special prefix.
Project: word-guessing-game/
With this project, we implement a word guessing game (which is also known as Hangman):
- The computer comes up with a word that is initially displayed as a series of blanks, one per letter.
- The human guesses letters. If they get a letter right, a blank is filled in. If they get more than eight guesses wrong then they fail the game.
This is what the game looks like:
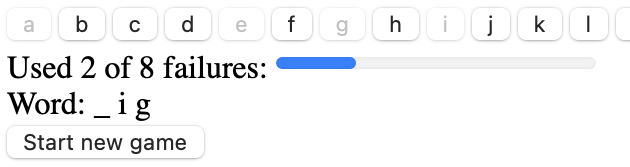
- At the top there is a series of buttons with letters.
- The user has already guessed “a”, “e”, “g”, “i”. Those can’t be used anymore and they are disabled (grayed out).
- Two of those guesses were wrong which is why the progress bar underneath the letters says: “Used 2 of 8 failures”
- Next, we can see the word: “_ i g” (one blank, two correctly guessed letters)
- Last, there is a button for restarting the game.
How to systematically come up with a solution for a given problem
Coming up with a solution for a given problem is always challenging – but it’s even more so if you are new to programming. In order to do that systematically, we can follow these steps:
-
First, we collect the requirements for the program: What is it supposed to do? Requirements can consist of sentences written down somewhere, diagrams, sketches of a user interface, etc. Once we have a good idea of what the program should do, we proceed to the next step.
-
Second, we come up with a model for the program: Which data structure(s) best represent the state of the program? It’s not necessary to immediately write code: We can once again sketch ideas and outlines until we are ready to write code. The model will usually be accompanied by functions or methods that operate on it and perform various tasks. We’ll see examples later in this chapter.
-
Third, we come up with a view for the program:
- What’s the HTML for the user interface?
- How do we display the model in that user interface?
What does the model look like?
The requirements were laid out in the previous subsection. What’s a good model then? The model must provide us with the information to do the following:
- Disable all buttons that have already been pressed.
- Display the number of failures.
- Display the word with blanks where a letter has not been guessed yet.
We only need two pieces of data:
wordLetters: an array with the letters of the word that the computer came up with.inputLetters: an array with the letters already entered by the user.
From these, we can derive all the information we need:
- Which buttons to disable? All those listed in
inputLetters. - How many failures? All
inputLettersthat are not inwordLettersare failures. - What’s the word with blanks? Per word letter:
- If it is in
inputLetters, it is displayed on screen. - Otherwise, there is a blank.
- If it is in
The previous list already gives us a rough idea of how to show the model in the view.
html/index.html
This is the HTML for the user interface:
<div id="letterButtonsDiv">
  <!--Generated via JavaScript-->
</div>
<div>
  <label>
    Used <span id="failureCountSpan">0</span>
    of <span id="maxFailuresSpan">0</span> failures:
    <progress id="failuresProgress" value="0">0</progress>
  </label>
</div>
<div>
  Word: <span id="wordSpan"></span>
</div>
<div id="message"></div>
<div>
  <button id="newGameButton">Start new game</button>
</div>
<script type="module" src="bundle.js"></script>
The buttons inside #letterButtonsDiv are added via JavaScript. They look like this:
<button class="letter" disabled>a</button>
They are disabled until the user starts a new game.
main.js: initializing the user interface
The initialization of the user interface comprises three steps. The last two steps complete the HTML; we don’t really need JavaScript here but it makes things more convenient.
Step 1: loading the words to guess
The following special syntax lets us import the JSON file words.json as if it were a JavaScript module.
import wordList from './words.json' with { type: 'json' };
This import statement has two new parts:
-
It imports differently:
import wordListis a default import. It can only be used with modules that have a special default export – a single value that “is” the module. Therefore, we now know the following kinds of imports:// Named import import {value} from './some-module.js'; // Namespace import import * as someModule from './some-module.js'; // Default import import someModule from './some-module.js'; -
It imports non-JavaScript data:
with { type: 'json' }.withand what follows is called import attributes.
Note that esbuild includes the JSON data in the bundle: If you take a look at its code, you’ll see the JSON data in there.
Step 2: displaying the maximum amount of failures in the user interface
const MAX_FAILURES = 8;
document.querySelector('#maxFailuresSpan').innerText = String(MAX_FAILURES);
document.querySelector('#failuresProgress').max = MAX_FAILURES;
Why do this? Should we ever change our minds about this number, we only have to change it in one location.
Step 3: creating the letter buttons
The following loop creates the letter buttons:
for (const letter of 'abcdefghijklmnopqrstuvwxyz') {
  letterButtonsDiv.insertAdjacentHTML(
    'beforeend',
    `<button class="letter" disabled>${letter}</button> `
  );
}
js/model.js
All the code that we have seen so far operates at the level of the view. In contrast, module model.js provides functionality for the model – it works with pure data. That makes it easy to test. In this section, we pair each function with its test (which is in model_test.js).
With the tests, we try to really put the tested functions through their paces, with all kinds of inputs. I wanted to limited the amount of code for this example project, but good additions would be using empty arrays for wordLetters and/or inputLetters.
Note that, in addition to checking if a function works, a test is also good documentation for humans because they can see which inputs are supposed to produce which outputs.
inputLettersToWordWithBlanks()
This function creates the feedback for the user: They can see which letters they have guessed correctly and which ones they have yet to guess. In the result, letters and blanks (underscores) are separated by spaces so that the blanks are easier to tell apart.
export const inputLettersToWordWithBlanks = (model) => {
  const result = model.wordLetters.map(
    (letter) => {
      if (model.inputLetters.includes(letter)) {
        return letter;
      } else {
        return '_';
      }
    }
  );
  return result.join(' ');
};

test('inputLettersToWordWithBlanks()', () => {
  const wordLetters = ['d', 'o', 'g'];
  assert.equal(
    inputLettersToWordWithBlanks({
      wordLetters,
      inputLetters: ['a', 'e', 'i', 'o'],
    }),
    '_ o _'
  );
  assert.equal(
    inputLettersToWordWithBlanks({
      wordLetters,
      inputLetters: ['d', 'g', 'o'],
    }),
    'd o g'
  );
  assert.equal(
    inputLettersToWordWithBlanks({
      wordLetters,
      inputLetters: ['a', 'e', 'i', 'u'],
    }),
    '_ _ _'
  );
});
isWordComplete()
Did the user guess all letters?
export const isWordComplete = (model) => {
  for (const wordLetter of model.wordLetters) {
    if (!model.inputLetters.includes(wordLetter)) {
      // We found a letter that wasn’t guessed yet
      return false;
    }
  }
  return true;
};

test('isWordComplete()', () => {
  const wordLetters = ['d', 'o', 'g'];
  assert.equal(
    isWordComplete({
      wordLetters,
      inputLetters: ['a', 'e', 'i', 'o'],
    }),
    false
  );
  assert.equal(
    isWordComplete({
      wordLetters,
      inputLetters: ['d', 'g', 'o'],
    }),
    true
  );
  assert.equal(
    isWordComplete({
      wordLetters,
      inputLetters: ['a', 'e', 'i', 'u'],
    }),
    false
  );
});
countFailures()
How many letters did the user guess wrong? Each input letter we can’t find among the word letters is a failure.
export const countFailures = (model) => {
  let failures = 0;
  for (const inputLetter of model.inputLetters) {
    if (!model.wordLetters.includes(inputLetter)) {
      failures = failures + 1;
    }
  }
  return failures;
};

test('countFailures()', () => {
  const wordLetters = ['d', 'o', 'g'];
  assert.equal(
    countFailures({
      wordLetters,
      inputLetters: ['a', 'e', 'i', 'o'],
    }),
    3
  );
  assert.equal(
    countFailures({
      wordLetters,
      inputLetters: ['d', 'g', 'o'],
    }),
    0
  );
  assert.equal(
    countFailures({
      wordLetters,
      inputLetters: ['a', 'e', 'i', 'u'],
    }),
    4
  );
});
js/main.js: core view functionality
The model is stored in a variable that is accessed by all functions that we explore in this section:
let model = undefined;
Displaying the model in the view
This is the most important view-related function: It displays the model in the view.
const updateUserInterface = () => {
  const failureCount = countFailures(model);

  //----- Display status: word and failures -----

  updateFailures(failureCount);
  updateWord(inputLettersToWordWithBlanks(model));

  //----- Update input buttons -----

  if (failureCount >= MAX_FAILURES) {
    setMessage('❌ Too many failures');
    disableAllInputLetterButtons();
    return;
  }
  if (isWordComplete(model)) {
    setMessage('✅ Success!');
    disableAllInputLetterButtons();
    return;
  }
  setMessage('');
  disableSomeInputLetterButtons(model.inputLetters);
};
The following view functions are not shown here:
updateFailures()updates the failure count displayed on screen.updateWord()updates the word with blanks displayed on screen.disableAllInputLetterButtons()does what its name says. This function is called after a game ends so that the user can make no further input (unless they start a new game).disableSomeInputLetterButtons()disables the letter buttons mentioned in its argument and enables all remaining buttons.
Note that this function does not incrementally update the view, it always updates the complete view with all of the model. When it comes to managing the view, we have two alternatives:
- Alternative 1: incrementally updating the model, then incrementally updating the view. Therefore: After adding an input letter to the model, we have to disable a single button, potentially increment the failures on screen and potentially change one letter of the displayed word.
- Alternative 2: incrementally updating the model, then displaying the whole model. Therefore: After adding an input letter to the model, we update all buttons, the failures on screen and the word via data that is either in the model or derived from it.
Alternative 2 is slightly less efficient but much simpler and there is virtually no risk of the view and the model becoming out of sync over time.
Starting a new game
The following function starts a new game:
const startGame = () => {
  const wordIndex = randomInt(0, wordList.length);
  const word = wordList[wordIndex];
  model = {
    wordLetters: Array.from(word),
    inputLetters: [],
  };
  updateUserInterface();
};
Handling input
The following function handles input:
const addInputLetter = (letter) => {
  model.inputLetters.push(letter);
  updateUserInterface();
};
Note that we did not have to perform incremental view updates, we could use the same function updateUserInterface() that was used by startGame().
Handling click events
How the user interface invokes startGame() and addInputLetter() is not shown here; it’s the usual event listener code.


Book (free online) and exercises

Book (free online)
Book (free online)
Book (free online)
Newsletter (free)